

In today's time, even a small company gets its website built and keeps a website expert to access it. If you are aware of creating a website, then today's article is just for you. In this article, we will tell you about 3 ways how to make a website for free on that topic.
 |
| MAKE DIGITAL NEPAL |
Before we start, we will know what are the benefits of creating a website, how to make a free website on Google, how to do blogging (how to create a blog), etc.
What are the benefits of building a website?
- 👉Popularity
- 👉Immerse yourself in the world of the Internet
- 👉Name/Fame/Money
- 👉Putting your photo on Google
If you have a site, then your popularity will be the same, apart from this, you will have a name in the Internet world so that you will be able to earn from your website and you will also be able to bring your picture on Google.
By the way, one advantage of creating a website is that we can share anything on it. For example, if we are fond of cooking and we know everything about cooking, then we can create a recipe website and put recipe information in it. We can sell our own written recipe and can also put AIDS on our website so that our income can be doubled. Now let's talk about how to make a website.
How to make a website? in English
There are many ways on the Internet to create a website on Google such as PAID / FREE.
Paid means, we will take a domain name and hosting and work on it. (In this you will get many features that are not in the free one.)
We do not have to pay any money for the free one, in this we get the domain and hosting for free, which we will read about in this article.
If you want to make a paid website, then you can read the article on How to Start a Blog. So are you ready to create your new blog and to do blogging in English so that you can earn money online sitting at home?
How to create your own blog 2021
We have many platforms to create a blog for free, but the one that is most popular is this one.
- Blogger
- WordPress
- Tumbler
- sites.google.com
Now we will talk about how to make a website on Blogger which is created by Google.
You will need a Gmail ID to create a website on Google.
If you do not know how to create an account on Gmail, then you can read the article on how to create an account on Gmail.
When you have completed all these steps, then you have to follow the steps given below. So let's make your new website and make yourself popular in the world of the Internet.
How to make your own free website on google?
- Step 1.
For how to create a website on Google, first of all, search "blogger.com" in Google Search or in your browser and click on it.
 |
| How to make a blog? |
- Step 2.
 | |
|
- Step 3.
 | |
|
- Step 4
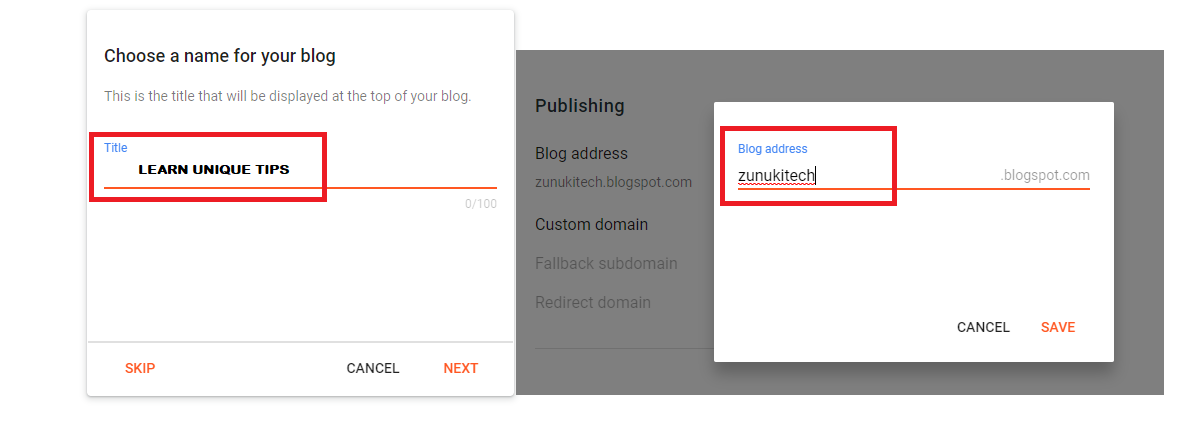
| Title | Write a good title for your website. Write a Catchy Title for your Website / Blog |
| Address | Address means 'Website name 'URL' What do you want to name your website, for example, what I have placed is "zunukitech.blogspot.com" and you can see in the picture below that the address is written on the right side below That “This blog address is available” means that the URL of this website is available and I can create a blog with this name. |
- Step 5
- Step 6

How to Make a Blog?in English
How to Create a Blog? in English
Step 1. Go to Sites.Google.com
- to link product
- You are using it to drive traffic
- Or if you do not have your own website, then you want to put your affiliate link on it.
Step 2. Enter Site Name
Step 3. Page Title
- Header Type
- Change Image
Step 4. Insert Pages & Theme
- Text Box- By clicking on this, you will get a box in which you write the content of whatever you want to put content about.
- Images- To make the site better, we also add images to our site, so friends, you also get that option here.
- Embed - With the help of this option, you can add a link to your site.
- Drive- You can put the file here on the site from the same drive from the Google account with which you are creating the site.
- Layout- This is a very good option, you can click on any layout as per your wish and manage photos and content accordingly.
- Button- With the help of this option, you can put options like read more, extra information, buy now, etc., which we get in many sites, in your site also.
- Preview- While working on the site, you can see with the help of this option how your site looks on a laptop and mobile.
- YouTube- If you have a YouTube channel, then you can also promote that video by putting its link here on your site.
- can.
- Map- If you want to add the location of any place, then you also get its option here.


1 Comments
Good Job vai
ReplyDeletePlease do not enter any spam link in the comment box.